Category Archives: Recipes

Pumpkin Spice Oatmeal

Standard
Pumpkin Spice Oatmeal

I’ve been a little obsessed with pumpkin lately.

It started with a blistering pumpkin spice latte. 

Then I tried making it at home.

I have never had a worse cup of coffee in my life.

I also made pumpkin spice cinnamon rolls.

As cinnamon rolls, they were quite good, but the pumpkin flavor was lacking.

I’m going to try again though, and adjust the amount of pumpkin.

My latest pumpkin spice creation has been oatmeal.

This was pretty good, and quite simple. 

I usually make my oatmeal on the stove, but you could easily make this in the microwave.

Add 2 generous tablespoons of pumpkin puree to your water. While you’re waiting for it to boil, sprinkle in some pumpkin pie spice. Then sprinkle in some more. 🙂 

Cook your oatmeal until tender (I prefer old fashioned), add a drizzle of honey, a sprinkle of walnuts and a splash of milk. So good!

This is an easy way to get more nutrition in your already healthy morning oatmeal.

Happy fall!

Let me know if you have any other pumpkin recipes that I should try.

I’ll let you know if I improve on that pumpkin spice cinnamon roll recipe. 🙂

Advertisement

How to Decorate a Sprinkle Cake

Standard

What can be happier than sprinkles? It’s really hard to be grumpy when you have sprinkles on your cake.

I was recently asked to make a smaller version of this cake from Something Turquoise for a birthday. I’m not nearly as good a photographer as Christa Taylor Photography is, but here are some of my shots of the process.

Did you know you can buy sprinkles by the pound?
I figured buying a gazillion little containers of sprinkles would be pricey, so I bought a whole pound from Amazon.

A pound of sprinkles

It’s about 2 cups of cheerfulness. 

For a sprinkle cake, I thought that funfetti would be the perfect choice for the inside. 🙂

It was a two tier cake, and each tier had 3 layers. The bottom was 9″ in diameter, and the top was 6″ in diameter. I used a total of 4 batches of buttercream to crumb coat and frost the cake.

There are various ideas floating around about how to apply the sprinkles. Some roll the cake in the sprinkles, some use parchment paper and press the sprinkles into the frosting, but I went a different route.

I reasoned that those little nonpareils would stick to freshly applied frosting if I just kinda sprinkled them on the cake. I tested my theory on a swatch of frosting smeared on a plate, and off I went.

After the final coat of buttercream, I took the cake, tilted it over a cookie sheet, and sprinkled the sprinkles over the sides first.

I sprinkled the tops last. I used about a cup of sprinkles for the whole cake.

I made the marshmallow fondant bows ahead of time so they could dry.

Fondant is like Play-doh for grown-ups. People don’t usually even eat the fondant, so maybe bakers should just switch to Play-doh. It is non-toxic, isn’t it??

I used wooden skewers in the bottom tier to support the top tier,  glued the tiers together with a little soft frosting, and kept it refrigerated.

I also put a skewer through both tiers to help prevent shifting during delivery. 

Driving with a cake is the most nerve-wracking part of the whole cake business, in my opinion. Always carry an emergency kit!

The fondant ribbon was added just before delivery. If you refrigerate fondant, it tends to “sweat,” or get shiny with condensation.

A little frosting “glue” to hold the bows on after delivery, and it was done!

How did it taste?

Like childhood.

What do you think? Who do you know that would love a cake like this?

How to Decorate a Buttercream Flower Cake with Russian Piping Tips

Standard

If you’ve been following my blog recently,  you know I recently got a very nice set of Russian piping tips. In my previous post, I shared some advice for using them, but here I’ll break down decorating that cake and tell you about the colors.

I decided to use shades of coral for this cake; I thought it would look nice against the brown mocha frosting.

I did a graduation cake  with coral peonies recently, and I loved the coral against the mocha.

I started with a bit of No-Taste Red and Golden Yellow and made the lightest colored flowers first, using a tulip tip.

Russian Piping tip

Then I darkened it a bit with more colors, and used the rose tip.

Can you tell I have an aversion to making lots of dishes? I just added more color and gave it a whirl in the mixer. 🙂

Russian Piping tip

Not sure what to call this last tip. Maybe another tulip? It makes pretty flowers though!

How to decorate a cake with Russian piping tips

A Wilton tip #352  with some Moss Green color finished out the design.

Those leaves are such a wonderful finishing touch! Love them!

Do you have any Russian piping tips yet? If you like to decorate cakes with flowers, they will totally change how you decorate a cake.

If you’re new to the Russian piping tips, be sure to check out my 5 tips for using them!

What do you think of the cake? Any more color scheme ideas for chocolate or mocha frosting? Maybe I should try white and pale green next time? Tell me what you think, I’d love to hear your ideas!

5 Pointers For Using Russian Piping Tips 

Standard
5 Pointers For Using Russian Piping Tips 

So my husband surprised me by ordering a mega set of the Russian piping tips. I was so excited!

It even came with some of the Russian ball tips, which make ruffled cupcake tops easily. It also came with some basic tips, only in a larger size. The really big petal tips are fun too.

What was of most interest to me was the all in one flower tips. With just one tip, you can make a flower quickly, without a flower nail, without changing tips!

Here’s my 5 tips for using these great decorating tools.

1. Make plenty of frosting; the tips are huge! See how big they are compared to a typical Wilson tip. I used a large Ateco coupler for them.

Size of Russian piping tip

2. Make your frosting really stiff so the petals will hold their shape. I used a classic buttercream. 

3. Don’t be afraid to pack the flowers closely together. The smaller you make the spaces between the flowers, the better it will look at the end. 

4. When you start squeezing the frosting out, be sure the frosting is anchored to the cake before you really start squeezing out the flower and pulling up. Stop squeezing when it’s as tall as you want, and carefully lift the tip straight up off the flower.

5. Adding leaves at the end really pulls it all together. I love a Wilton tip #352 for leaves. I used Wilton’s Moss Green color for the cake above because I think it looks more natural.

How to use Russian Piping tips

I’ll be posting how I decorated this cake soon- so if you want or know what tips I used and what I mixed to get those shades, check back tomorrow!

Remember, you can like Coffee to Compost on Facebook or subscribe to me via email too. 🙂

Do you have these tips yet? What do you think of them?

Layered Peach Melba Jam

Standard

DSCN7793[1]

Layered Peach Melba Jam

I love the ease and flavor of homemade jam. Peaches are in season now, and I scored an incredible deal for 75 lbs of peaches. I have canned some slices, canned peach jam, frozen peach slices, but my latest peach project has been a layered peach-raspberry jam, or peach melba jam.

The recipe I saw in the Ball Book calls for them to be combined, but I decided to play with the recipe a bit, split the two jams, and see what happened. That’s pretty much what I do with most recipes.

“Oh, this calls for chicken and sesame oil and chili powder…I think I’ll substitute pork, add some sesame seeds and sprinkle in some Cajun seasoning.”

Anybody else use perfectly nice recipes as a springboard for what you want to make?

This layered version is a bit involved, but the visual effect is worth it. Well, I think so anyway. It is a bit time consuming, I have to warn you.


You will need:

8 cups peeled chopped peaches

1 cup raspberries

4 1/2 cups sugar, divided

1 box lower sugar pectin, divided

Yield:approximately 9 half pints (6 layered peach melba jams and 3 peach jams)


DSCN7775[1]

Start by prepping the fruit. Peeling the peaches is the most time-consuming part of the whole process.

Wash the jars and put in the hot canner.

I chose to make the raspberry jam first because I though it would look better that way and I figured it would be denser and more likely to stay in a layer at the bottom.

Crush the raspberries or give them a quick whirl in a food processor. Measure 1/2 cup of sugar for the raspberry jam. Whisk 1 tablespoon of the pectin and 2 tablespoons of the sugar together, then into the raspberries. Heat to a rolling boil, stirring constantly, then add the rest of the reserved 1/2 cup. Heat to a boil again, stirring constantly, then boil for 1 minute. Remove from heat, and carefully put 1/4 cup of the raspberry jam into each of 6 jars.

DSCN7776[1]

You could of course make the layers thinner and put some in all 9 jars. Totally up to you.

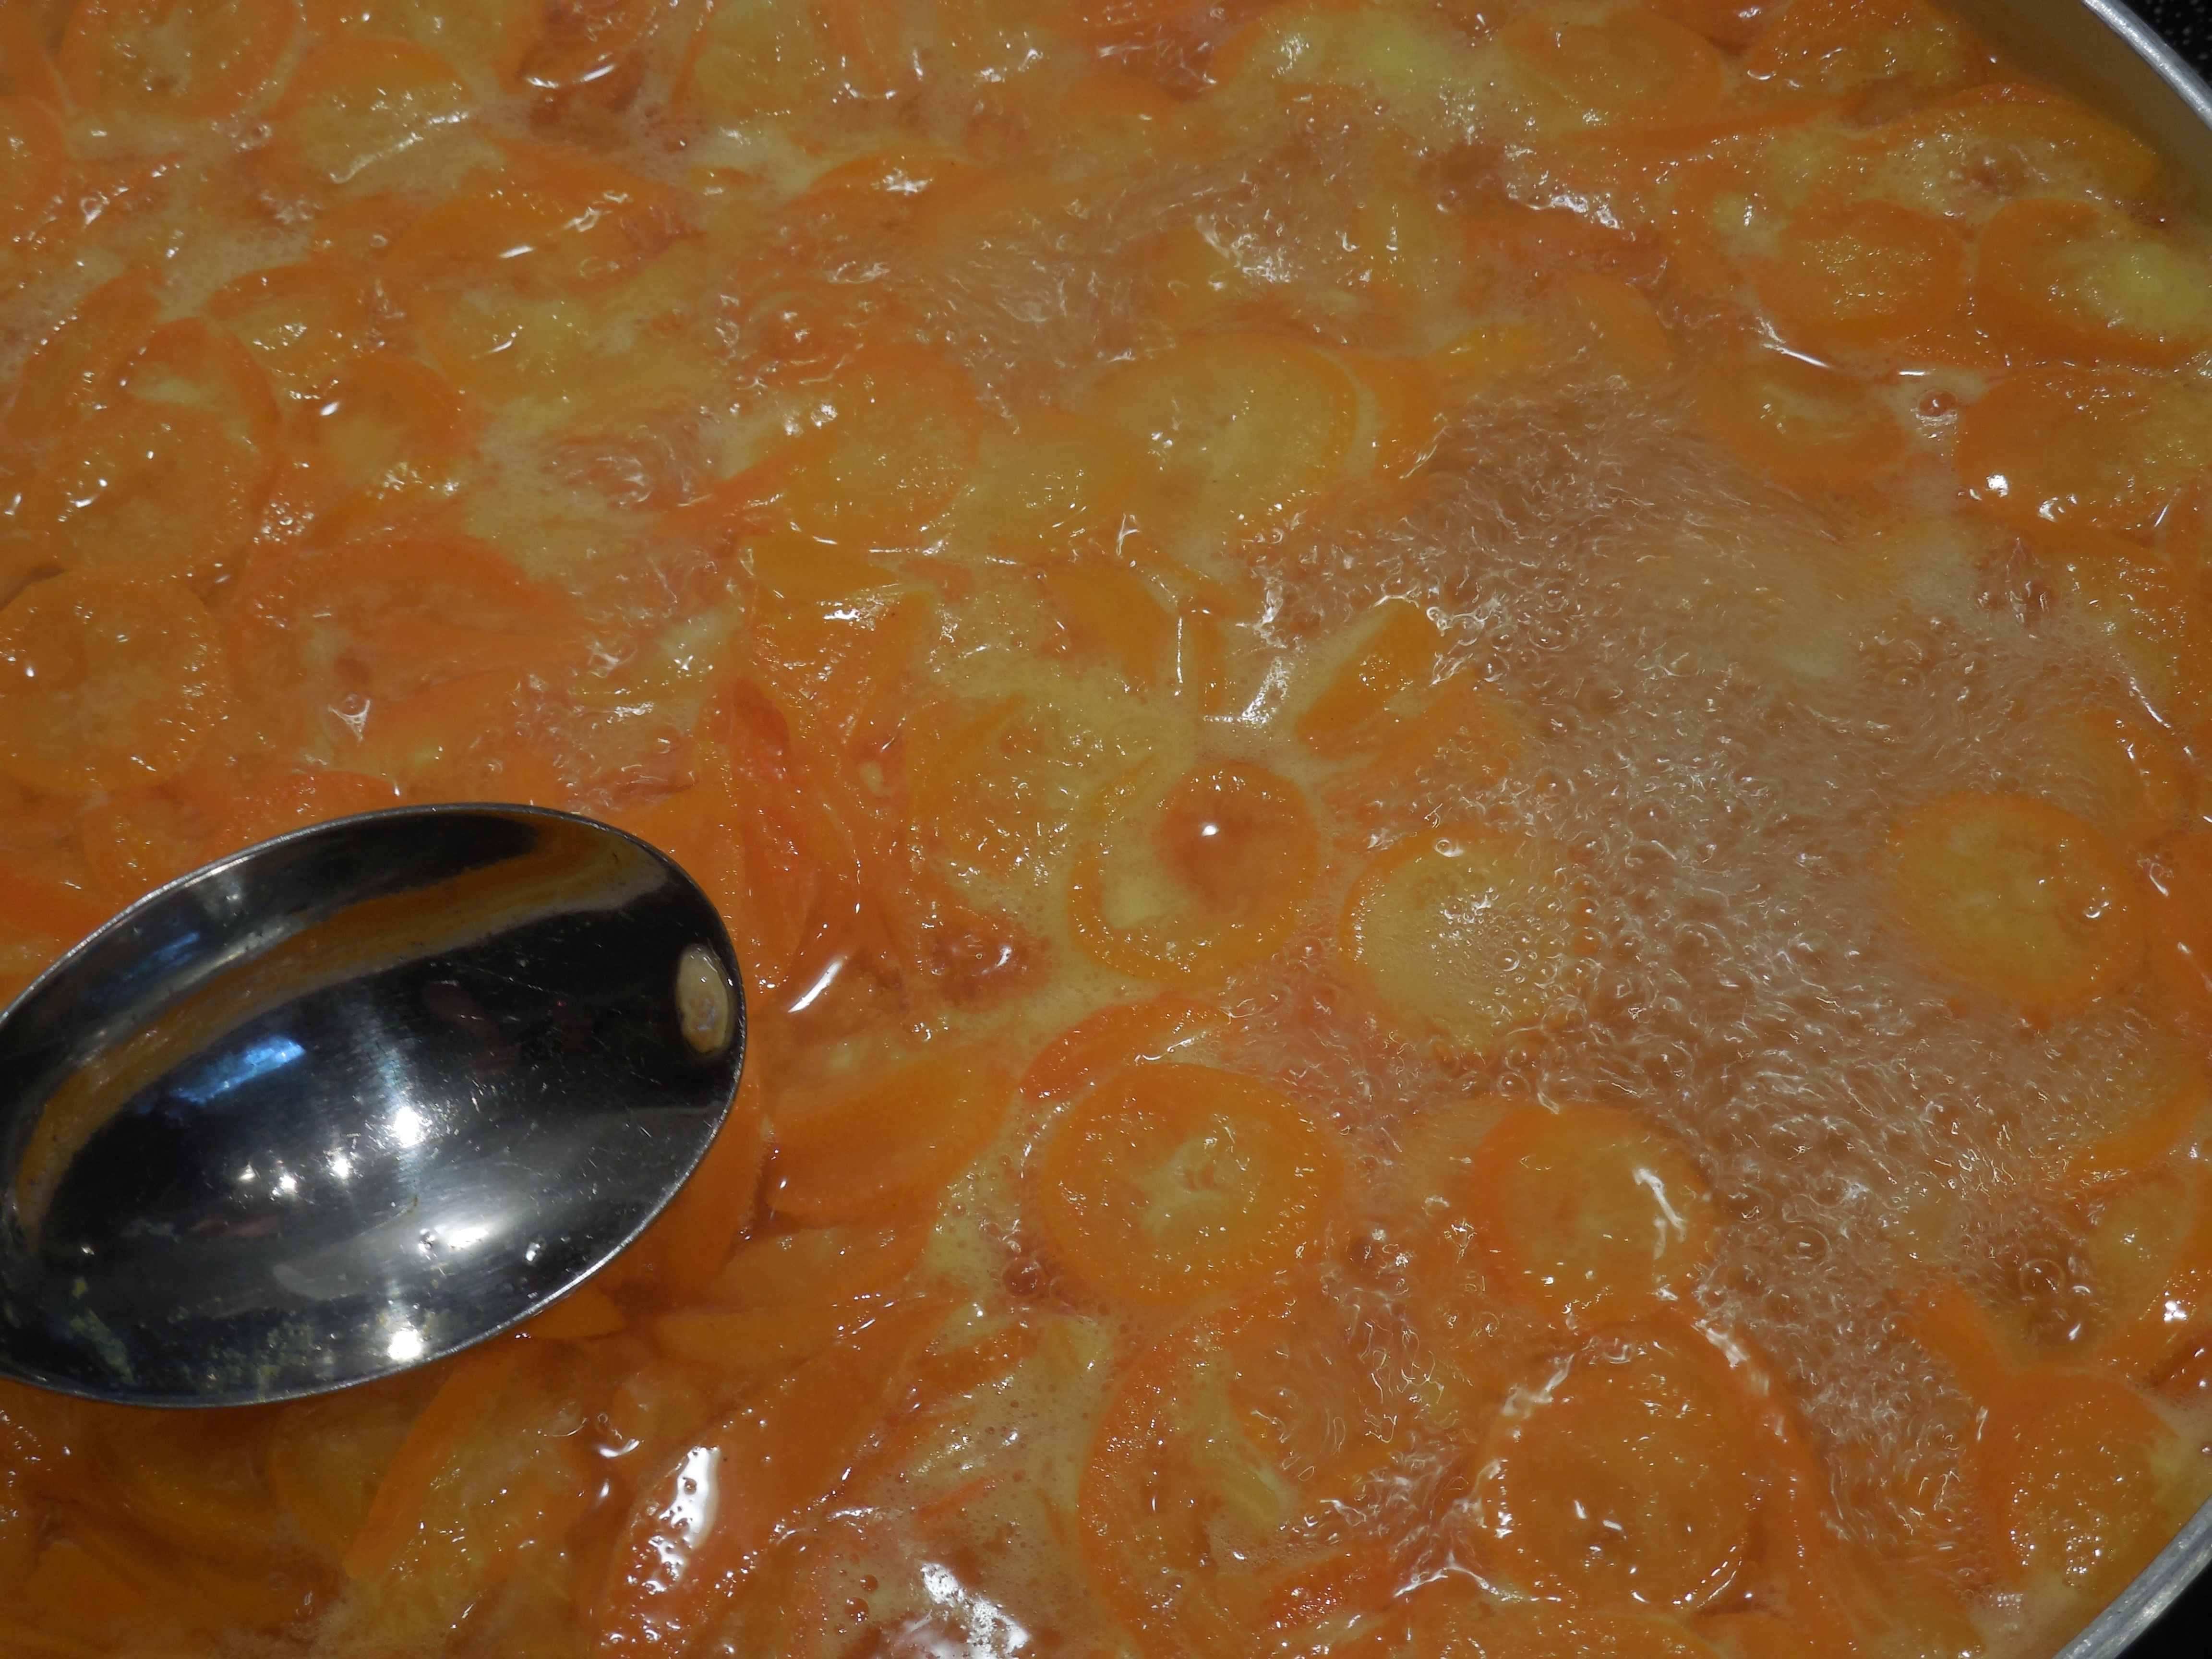
Now it’s time to make the peach jam. Whisk the remaining pectin into 1/4 cup of the remaining sugar, then heat the peaches and the sugar/pectin mixture to a rolling boil. Add the rest of the sugar and heat to boiling again, stirring constantly. Boil for one minute, then turn off heat and remove pot from heat.

I like to live dangerously, so I just used what was left in the packet of pectin, rather than a whole other packet, which was risky.

It worked for me, and the jam set nicely, but you may want to use a whole packet.

DSCN7777[1]

Carefully ladle the peach jam into the jars, leaving 1/4 inch headspace.

Top with warmed lids and screw on rings gently.

Process half pints for 10 minutes.

DSCN7792[1]

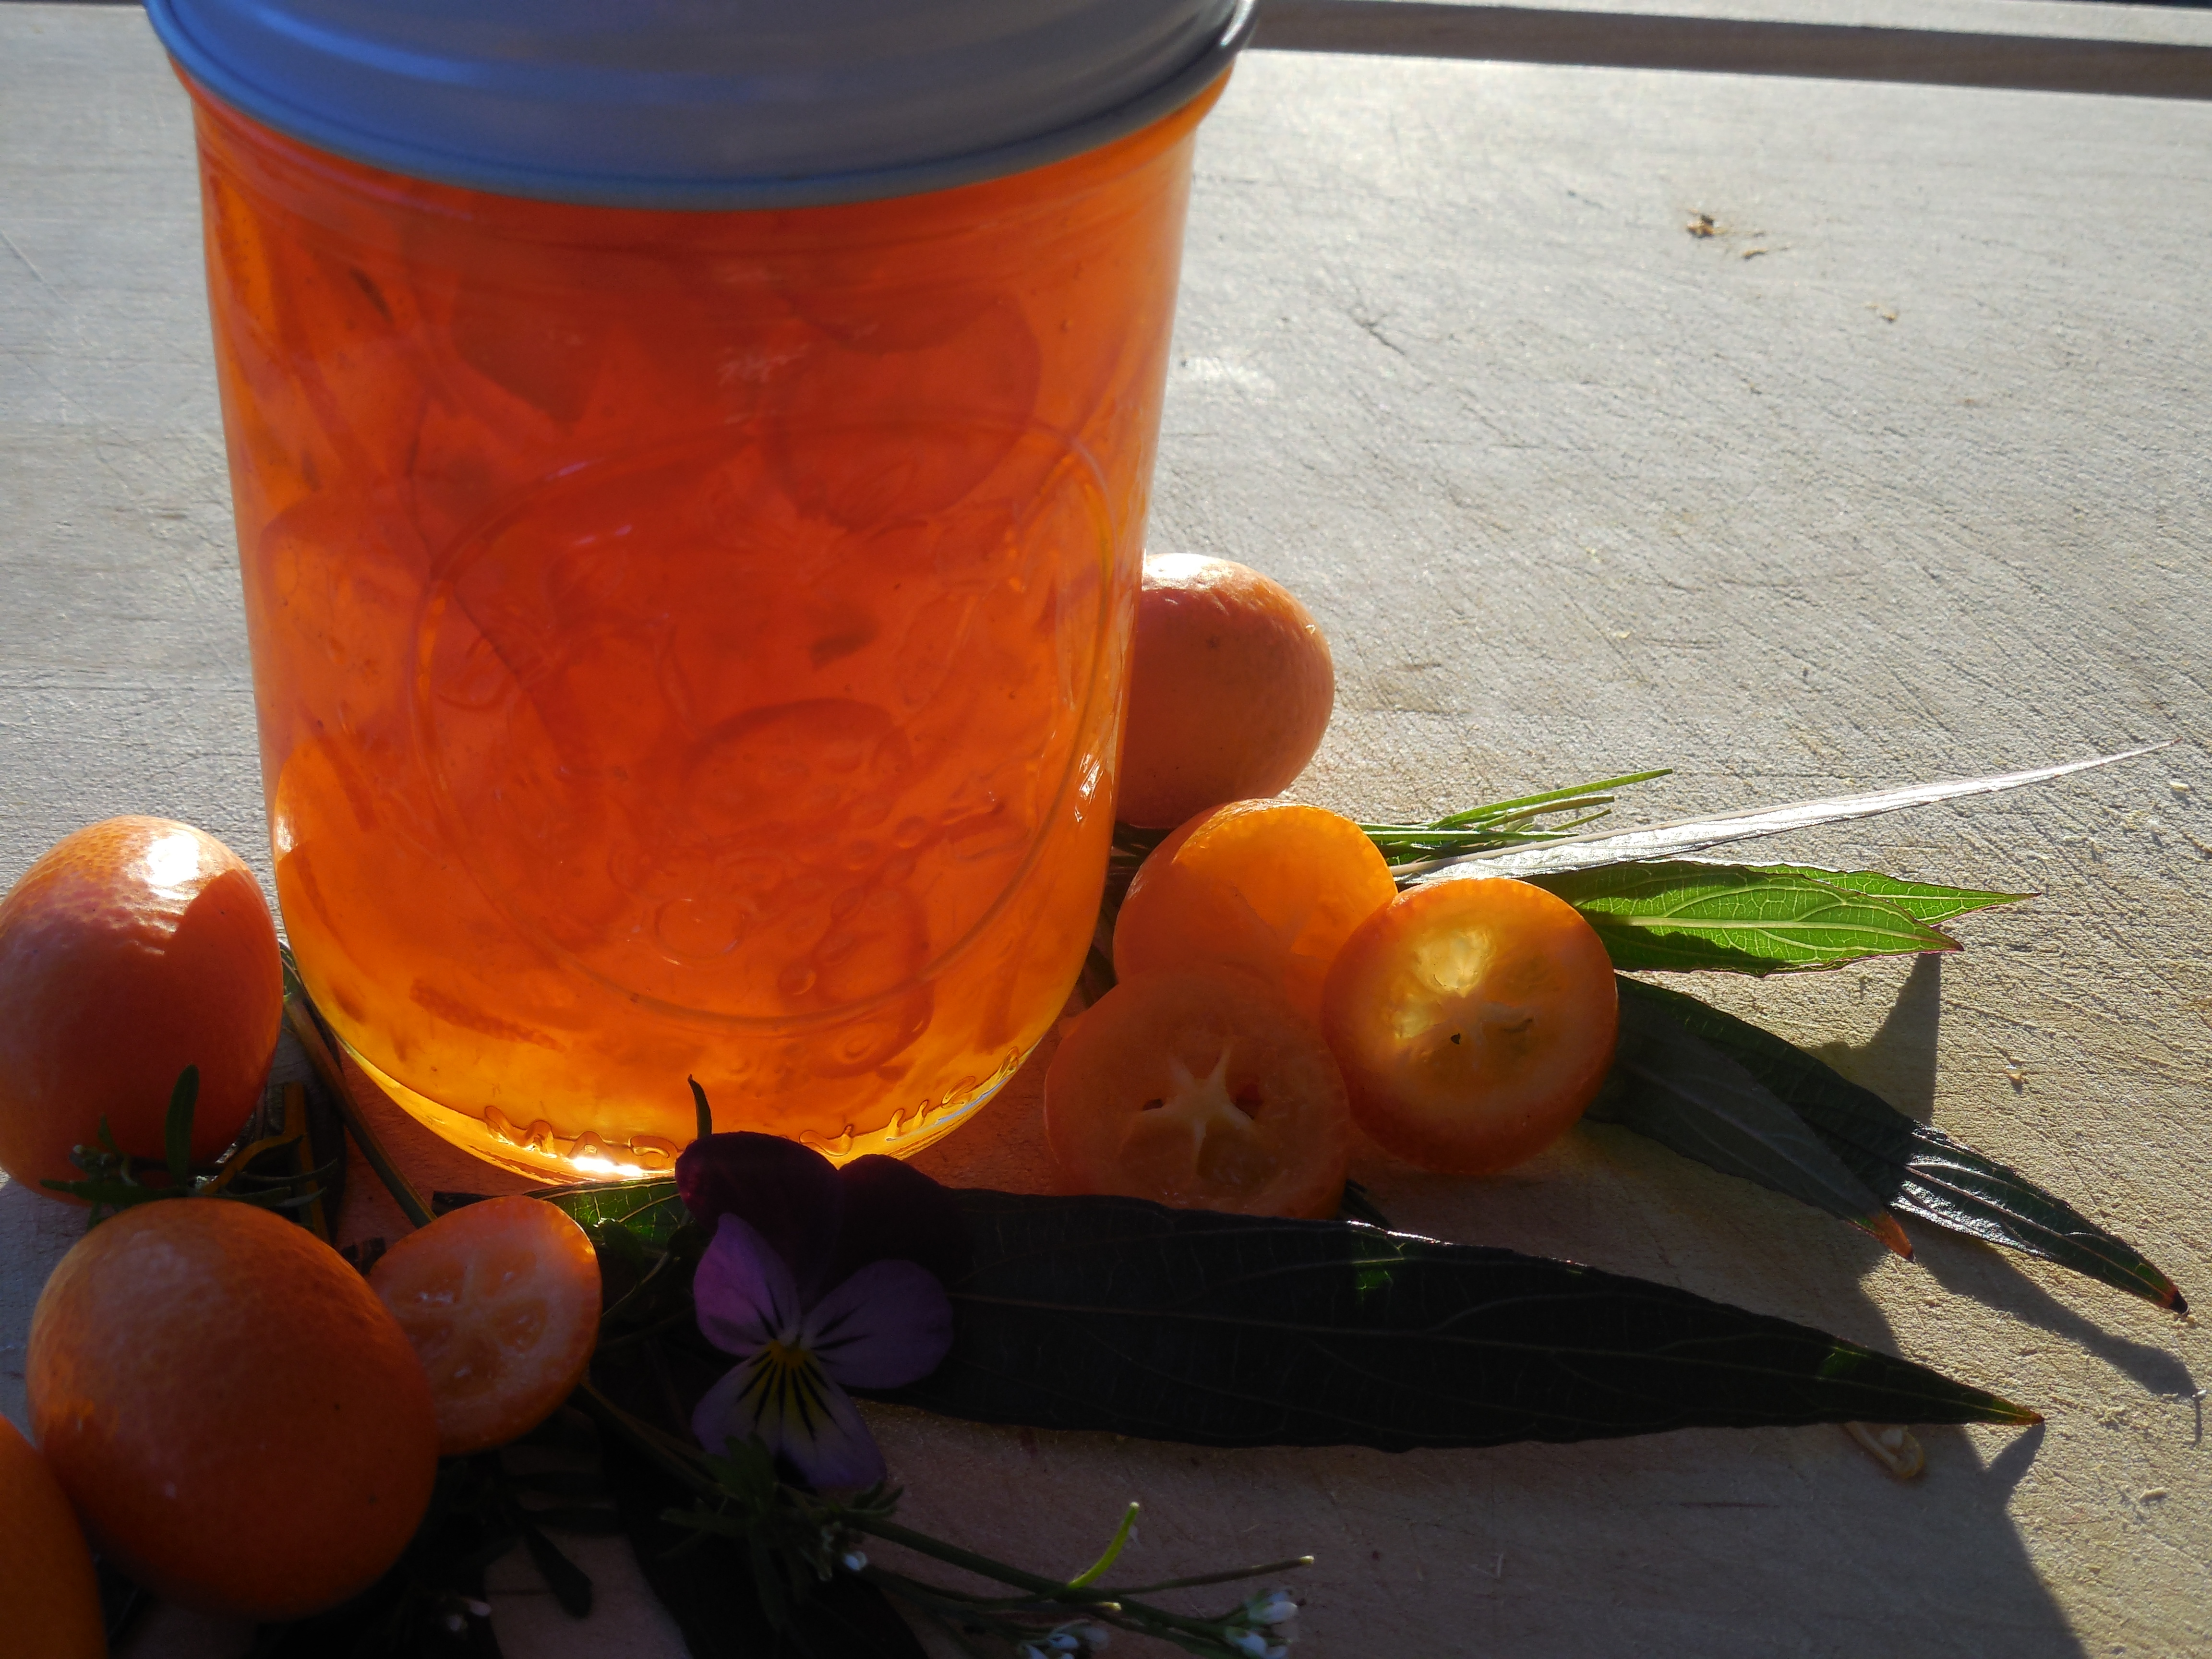
Peach Melba Jam Recipe

I love the look of a layered jam! I’m wondering if I should have put the raspberry on top, but it’s too late now. Maybe if I make another layered jam I’ll put the darker jam on top.

Blueberry and peach would be another pretty combination, don’t you think? I’ve combined them in a jam before, but it might be pretty to separate them.

Have you made a layered jam? I’d love to hear about it in the comments!

Summer is such a busy time in the kitchen. I’ve been working with blueberries, peaches, and figs are next!


Congratulations Class of 2016!

Standard

Summer is here, and the new crop of graduates is being released from school to take a break!

Some will start college this fall, some grad school, some will finally get to work that job for which they have trained so long.

How about some cake?

coral peonies

Does homemade chocolate cake with mocha frosting sound good? I thought so, and gauging from the rate at which it disappeared, so did the teens for whom it was made.

DSCN7602

That’s all that was left.

I like baking for teenagers; they’re not shy about coming back for seconds!

DSCN7588

I made the coral peonies on pieces of parchment paper, then popped them in the freezer until I was ready to place them on the frosted cake.

The mocha frosting was firm from the fridge, so I had a bit of liberty as I placed them to change my mind and adjust them slightly. This was much less stressful than trying to pipe perfect peonies at just the right spot on the cake. I added the leaves once they were in place. I love the Wilton tip#352 for leaves.

DSCN7589

I had fun with the bottom border, and you can see it a bit in this picture.

Well, actually it started out that I wasn’t sure that I would have enough coral buttercream to do the bead border, so I just did it in spots, then decided to pipe some leaves and yellow dots and so it turned out pretty fancy. I think I did have enough coral, but I do like the more involved border sometimes. 🙂

I have fun making cakes, and I do like decorating them with garden fresh flowers, and sometimes it’s fun to make a woodland cake with fondant toadstools.

Now I’m in the mood for more ChocaMocha cake!

Congratulations class of 2016!

Easy Roasted Cabbage Wedges

Standard

Are you getting your menu together for St. Patrick’s Day? Corned beef and cabbage, right?

Did you know you can make your corned beef in the Crock-Pot? Yep, set it before you go to work and come home to dinner. I wrote about it in this post, and I plan to do mine in the Crock-Pot again this year.

If you are looking for a new way to eat the cabbage that is such a great price this time of year, try roasting it.

Preheat the oven to 425 degrees.

Peel off the outer leaves of your cabbage, and give it a good rinse.

Cut it into wedges.

Lay the wedges on a cookie sheet that has been coated with olive oil

DSCN5915

Generously salt and pepper, and drizzle with more olive oil.

Roast for 10 minutes, then carefully turn them over, using a spatula.

DSCN5917

Roast for about 7 more minutes, or until the centers are soft and the edges are crispy.

This will help you see the humble cabbage in a new way.

Cabbage: good for more than just sauerkraut.

Don’t forget the corned beef!

Kumquat Marmalade

Standard
Kumquat Marmalade

It’s kumquat season! If your tree is going bonkers, or you have access to fresh kumquats, you may be wondering what to do with these unique fruits. I’ve been using kumquats in various recipes, but this is my favorite.

You only need kumquats, sugar, and water to make this fresh marmalade.

DSCN7143
Slice kumquats crosswise to make 5 cups, removing the seeds as much as you can. This is the tedious part.

You will go through various emotional stages as you slice the small kumquats.

Cup 1: Oh, how pretty!

Cup 2: This isn’t so bad.

Cup 3: Wow, it really took a long time to just slice that last one cup.

Cup 4: This is ridiculous. Who is even going to care that they are sliced in rounds?

Cup 4.5: Almost there…you can do this…

Cup 5: Yay! I’m done! I am never going to so this again. Next time I’m just going to chunk them in a blender.

DSCN7145

Chunking them is totally acceptable, but I do like how the slices turned out.

My next batch may be a mix of both, though. 🙂

Boil with 6 cups of water for 5 minutes. This is a good time to skim off any seeds you missed.

Let cool, then set in fridge overnight.

Mix in 4 cups of sugar. Cook over high heat, stirring constantly, until it reaches 220°F or passes the gel test.

Ladle into prepared jars, leaving 1/4 inch headspace. Can pints or half pints in boiling water bath for 10 minutes.

Yield: 5 half pints
DSCN7191
I was concerned that just using kumquats wouldn’t give me enough jelly between the rind pieces, but it turned out that there is plenty of sparkling jelly.

I love the look of the thin strips of rind and the few circles that were left after the cooking process. If you prefer more bites of peel per bite, you may want to process some of the kumquats.

For other two ingredient jams, check out my post on strawberry jam (my husband’s favorite!), and  peach jam.

Look for my Strawberry Kumquat Marmalade recipe soon!

Woodland Themed Baby Shower Cake Tutorial

Standard

I love chocolate cake. When I was talking over cake ideas, the idea of a log cake for a woodland themed baby shower was tossed out for consideration. Gotta be chocolate.

Three cakes from Pinterest were sent to me as inspiration (this one, this one, and this one), and I started looking at cakes and sketching ideas.

DSCN7055

Woodland Themed Cake

I decided to to do a tall log on its side, and to do the outside log detail out of chocolate fudge frosting, and to fill it with mocha filling. The cake would be chocolate, of course!

DSCN7038.JPG

It was 6 layers tall, and so needed some simple engineering to keep it from collapsing from its own weight. I used dowel rods to support the top three layers on their board.

I kept the cake extremely cold or frozen during the stacking and crumb coat.

I used a small offset spatula to add the grooves in the bark, and added accents of light brown with remaining mocha frosting.

The top was the lighter brown mocha, with the rings added using small round tip, then smudged slightly.

DSCN7049

Woodland Cake Stand

A little green was spackled on too, to look like moss. Hunter green leaves (I used a Wilton #352 tip) added interest on the sides and fastened the toadstools on the cake.

Yep, that’s a real slice of wood as the cake stand! A piece of parchment paper protected the  cake (and eaters!) from splinters. 🙂

I made little toadstools out of marshmallow fondant, let the the caps and stems dry separately overnight, then painted the caps with Wilton red frosting color. Half of a toothpick helped support the toadstools, and white frosting glued them together and was piped on in polka dots. I really liked the color that they added.

DSCN7054

Woodland Cake Idea

Bunting(made by the crafty mommy) and a cute little fox garden pick completed the look.

The guest of honor was very happy  with the cake. 🙂

Chocolate and coffee- one of my favorite combinations!

How to Strain your Homemade Yogurt to Make It Thick

Standard

You can make your own yogurt at home, but if you are expecting mounded spoonfuls, you will probably be disappointed.

Making homemade yogurt is easy (see how in my post here), and straining it requires practically no effort.

DSCN7057

After the culturing time, simply pour your warm yogurt into a strainer lined with cheesecloth. I used a double layer.

A friend of mine didn’t have  cheesecloth and used coffee filters instead, and she was able to get the Greek yogurt consistency that she wanted. I tried it that way too, and it worked just fine.

I set mine in the fridge to strain, that way it is cold at the end of the straining time.

DSCN7058

You should have a commercial yogurt consistency in just three hours. Leave longer if you want Greek yogurt.

If it gets too thick, simply whisk in some of the whey.

Don’t throw away the yellow whey that is left!

I store my whey in the fridge and have used it in place of milk in a muffin recipe. I want to try it in homemade bread too. A few nights ago I replaced most of the milk in a waffle recipe with the whey.  They were the softest, most tender waffles I have ever eaten.

I’m guessing that the fine texture was due to the acidic whey reacting with the baking powder-maybe one of you foodies could confirm my theory?

wp-1452574245456.jpg

Have you made homemade yogurt yet? Do you strain yours, or eat as is?

What do you do with the whey?